File Permissions and Access Control Lists
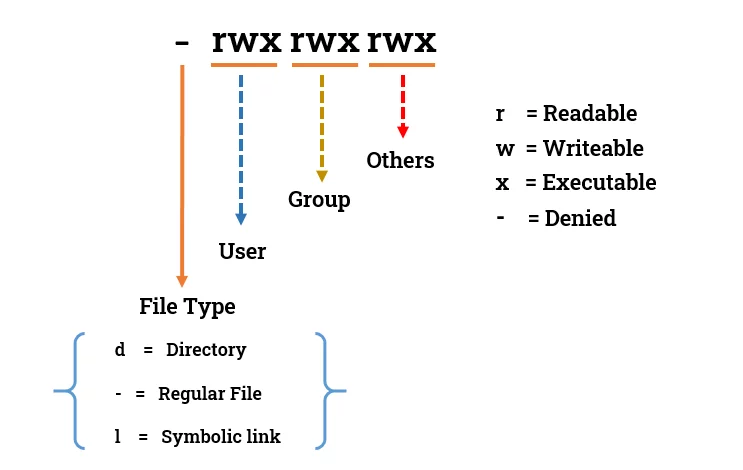
Understanding File Permissions:
Each of the three permissions are assigned to three defined categories of users. The categories are:
Owner: The owner of the file or application.
- Use
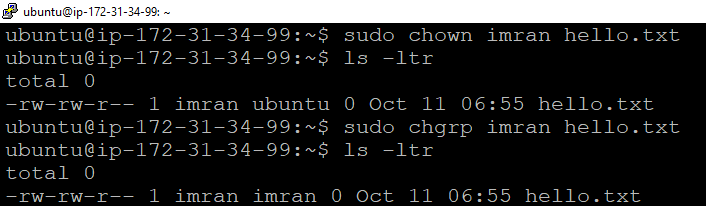
chownto change the ownership permission of a file or directory.
- Use
Group: The group that owns the file or application.
- Use
chgrpto change the group permission of a file or directory.
- Use
Others: All users with access to the system (outside the users in a group).
- Use
chmodto change the other users' permissions of a file or directory.
- Use
Let's break down the steps for creating a file, viewing its permissions using ls -ltr, and modifying the permissions using chown, chgrp, and chmod.
- Create a simple file and run
ls -ltrto see the details of the files.

touch will create an empty file
view the file's details and permissions, run: ls -ltr
Change Ownership and group :
The chown and chgrp command to change the ownership of the file
Change Permissions :
The chmod command to change file permission of file
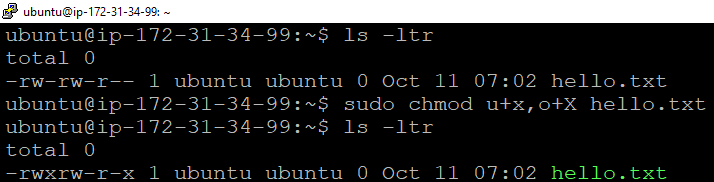
added execute permission to user and group
Understanding File Permissions in Linux :
Linux is a powerful operating system known for its flexibility and control, particularly in managing file permissions. Understanding file permissions is crucial for maintaining system security and ensuring proper access control in a multi-user environment. This article delves into the various types of file permissions in Linux, including the traditional permissions model.
Traditional File Permissions
In Linux, every file and directory has three types of permissions associated with it:
Read (r): Allows users to view the contents of a file or list the contents of a directory.
Write (w): Permits users to modify or delete a file or add/remove files in a directory.
Execute (x): Allows users to run a file as a program or script.
User Types
Permissions are assigned to three categories of users:
Owner (u): The user who created the file.
Group (g): A group of users that the file belongs to.
Others (o): All other users on the system.
Permission Representation
Permissions can be represented in two ways:
Symbolic Notation:
For example,
rwxr-xr--indicates:Owner: read, write, execute
Group: read, execute
Others: read
Numeric (Octal) Notation:
Permissions can also be represented as numbers, where:
Read = 4
Write = 2
Execute = 1
The permission
rwxr-xr--translates to755in octal (4+2+1 for owner, 4+0+1 for group, and 4+0+0 for others).
Access Control Lists (ACL):
ACL stands for Access Control List. It’s a more flexible way of managing permissions in a file system compared to traditional Unix permissions (owner, group, and others).
What is an ACL?
An ACL allows you to specify permissions for multiple users or groups on a single file or directory. Instead of just having the standard read, write, and execute permissions for the owner, group, and others, ACLs let you fine-tune access rights.
Why Use ACLs?
Granular Control: You can specify different permissions for different users or groups without changing ownership.
Complex Scenarios: They are useful in scenarios where you need to share files among various users with varying access levels.
Use Case Example
Imagine you have a project folder that needs to be accessed by multiple team members:
User A: Needs full access (read, write, execute).
User B: Needs read access only.
User C: Needs read and write access but not execute.
With ACLs, you can set these specific permissions for each user without changing the group or owner of the folder.
How to Use ACLs
Check if ACL is Supported:
- Most modern filesystems support ACLs (like ext4, xfs). You can check if a filesystem is mounted with ACL support by looking at
/etc/fstab.
- Most modern filesystems support ACLs (like ext4, xfs). You can check if a filesystem is mounted with ACL support by looking at
Set ACLs:
Use the
setfaclcommand to set permissions. For example, to give User B read access to a file calledexample.txt, you would run:setfacl -m u:UserB:r example.txt
View ACLs:
You can see the ACLs on a file using:
getfacl example.txt
Remove ACLs:
To remove a specific ACL entry:
setfacl -x u:UserB example.txtTask: Create a directory and set specific ACL permissions for different users and groups. Verify the permissions using
getfacl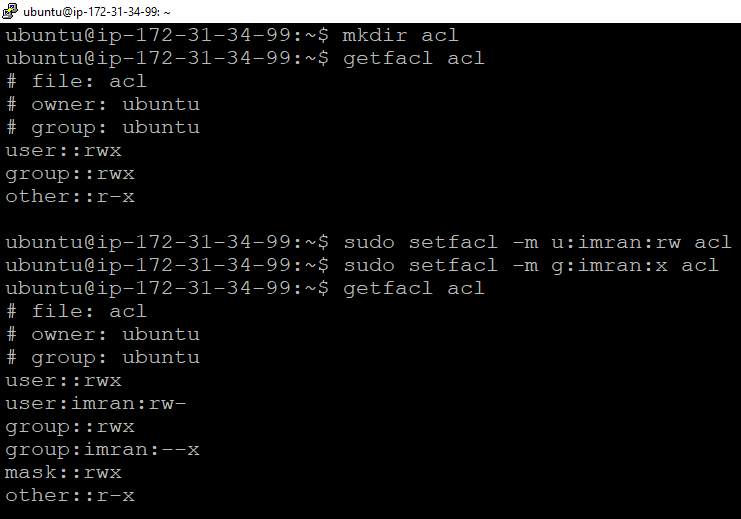
Conclusion
ACLs enhance file security and accessibility by allowing precise control over who can do what with files and directories. If you're working in a multi-user environment or have specific access needs, using ACLs can be a great solution! If you have more questions about ACLs or anything else, feel free to ask!
Additional Tasks
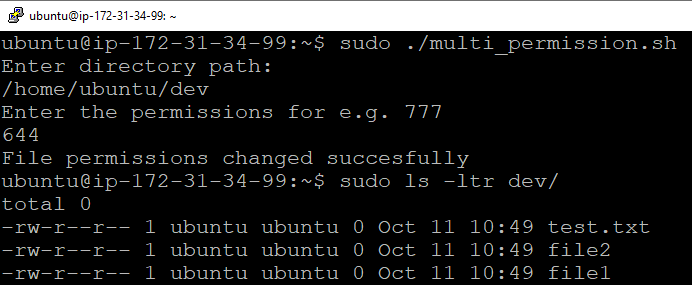
Task: Create a script that changes the permissions of multiple files in a directory based on user input.
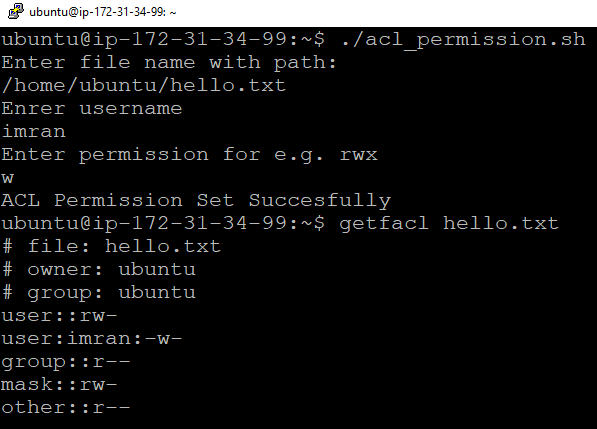
Task: Write a script that sets ACL permissions for a user on a given file, based on user input.
Understanding Sticky Bit, SUID, and SGID:
1. Sticky Bit
What It Is:
The sticky bit is a special permission that can be set on a directory. When applied, it restricts file deletion within that directory.
How It Works:
Only the owner of a file or the root user can delete or rename files within a directory that has the sticky bit set, regardless of the directory's permissions.
It’s commonly found on directories like
/tmp, where many users have write access but shouldn't be able to delete each other's files.
Use Case:
If you have a shared directory for temporary files, you would set the sticky bit to prevent users from accidentally or maliciously deleting files created by others.
    # Setting the sticky bit on /tmp
    chmod +t /tmp
2. SUID (Set User ID)
What It Is:
SUID is a permission setting that allows a user to run an executable with the permissions of the executable’s owner (usually root) rather than the user who is running it.
How It Works:
When an executable has the SUID bit set, it allows regular users to execute it with the elevated privileges of its owner.
This is useful for programs that need to perform tasks that require higher permissions.
Use Case:
A common example is the passwd command, which allows users to change their passwords. Since it needs to modify system files, it has the SUID bit set.
    # Setting SUID on an executable
    chmod u+s /path/to/executable
3. SGID (Set Group ID)
What It Is:
SGID is similar to SUID but applies to group permissions. When set on a directory, new files created within it inherit the group of the directory rather than the group of the user creating the file.
How It Works:
This ensures that files created in that directory belong to the specified group, making collaboration easier.
For executables, running a file with the SGID bit set executes it with the group permissions of the file's group.
Use Case:
A shared project directory can use SGID to ensure all files created within it have the same group ownership, allowing easy collaboration among team members.
    # Setting SGID on a directory
    chmod g+s /path/to/directory
Summary
Sticky Bit: Prevents file deletion in a shared directory (e.g.,
/tmp).SUID: Allows users to execute a program with the permissions of the program's owner.
SGID: Ensures files created in a directory inherit the directory's group ownership.
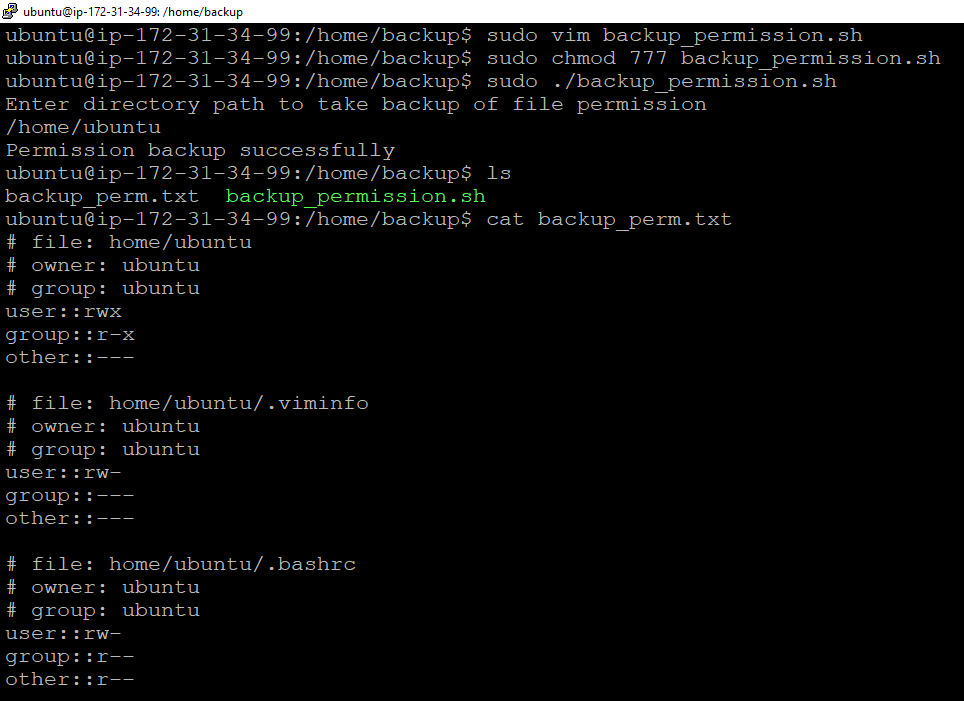
- Backup and Restore Permissions:
Task: Create a script that backs up the current permissions of files in a directory to a file.
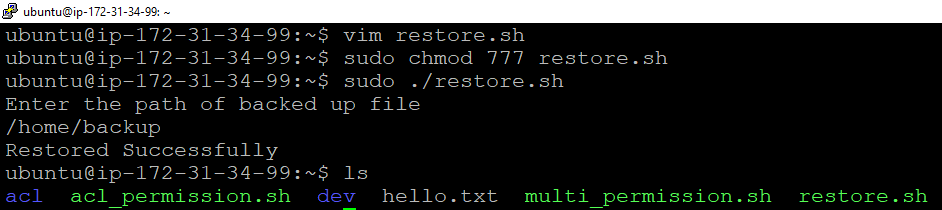
Task: Create another script that restores the permissions from the backup file.
Happy Learning:)